Upgrade your car with TIG welding
Most cars are designed with a grille at the front, to protect the radiator’s delicate fins and tubes from flying debris. Besides this practical function, a grille can add style and character to a car. We’re going to make a grille from stainless steel — a material which can be polished to a mirror-like finish and can endure exposure to harsh weather without tarnishing.
The first step is making the pattern for the grille surround. The aluminum race car nose I’m working with already has the opening cut out for the grille, so I used masking tape to make a border around this hole. I made the band 7/8-inch wide, to be proportionate. Next, I made a paper pattern for one side of the grille surround. Since the grille is symmetrical, I can use this pattern for both sides.

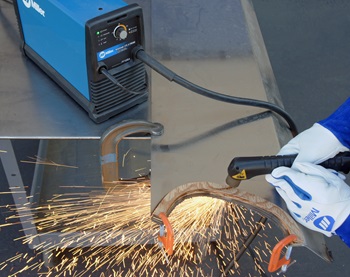
The grille surround is made from 14-gauge 304 stainless sheet. I used my Miller® Spectrum® 375 X-TREME™ plasma cutter, which makes fast work of cutting this tough material. Using my paper pattern as a template, I cut a piece of plywood to use as a guide for the plasma torch. The nosepiece of the torch is 3/8-inch diameter, so I reduced the size of the guide 3/16 inch around the perimeter, ensuring the cut parts would be the correct size. To get the best
quality cut, the tip of the plasma torch should be raised slightly from the surface of the metal being cut.
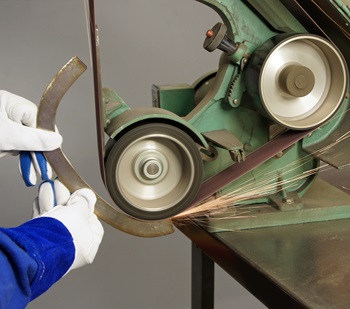
I used a belt sander with 50-grit abrasive belt to smooth the edges of the plasma-cut parts.
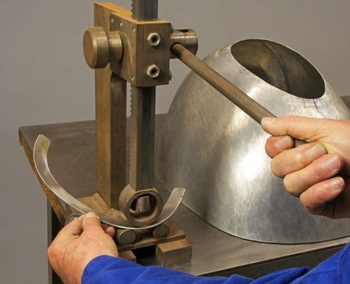
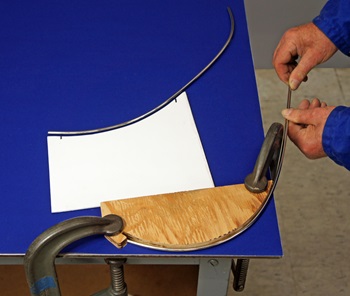
The surround needs to be contoured to match the shape of the nose. I made a simple fixture for my arbor press to do this. It has two supports on the bottom, and a rounded nosepiece on the ram, allowing me to curve stock like this with precision. I work slowly across the part, making small bends about 1/2 inch apart, gently dialing in the contour. If any area is overbent, it can be put in the fixture upside down to make corrections.
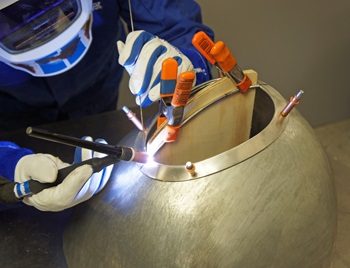
Once both sides of the surround were contoured, they were attached to the nose with Clecos, trimmed to fit precisely at the joint, and tack welded together. After double-checking the fit to the nose, the pieces were TIG welded together with my Miller Dynasty® 210 TIG welder, using 1/16-inch 308 filler rod. I’m using a 3/32-inch, 2 percent ceriated electrode, sharpened to a fine point. After welding the outside, the band was removed from the nose, and I made a light pass on the inside of the joint to ensure the penetration was 100 percent, then the welds were sanded flat.

I drilled holes for Clecos to hold the grille surround temporarily to the nose. These hole locations will be used later for the machine screws which will fasten the grille to the nose.
The bars for this grille are made from 3/16-inch 304 stainless cold finished round stock. I cut enough bars to make the grille, plus a couple extra, and sent them out to be pre-polished. It’s difficult to polish the areas between the fragile bars on a finished grille, so pre-polishing the bars gives you the best result.
Each bar needs to be contoured to match the nose. In the photo below, you’ll see the template I made showing the contour of the center grille bar. On a grille this small and simple, the same contour can be used for all the bars.
I made a simple bending fixture from plywood. Stainless has a lot of springback, so I had to adjust the shape of this fixture several times. I fiddled with the shape until I could bend a bar tightly against it, then have the correct contour after it relaxed, with no further adjustment.
To make a bend, one end of the bar is slipped into the notch at the left of the fixture. Next, the bar is pulled back against the fixture until it makes contact all the way to the top edge. I cut the blanks more than twice the length that was needed — so one blank makes two bars, plus a little wiggle room. This gives me more leverage for making each bend, which is a real advantage. The photo shows how well the bent bar matches the template.
Once the bars were bent, each one was trimmed to length, and tack welded to the surround. I fitted the center bar first, using spring clamps to hold it to a piece of 3/8- inch plywood, which was jigged to be plumb — this holds the bar securely in the proper orientation. I designed this grille to have 3/8- inch spacing between the bars, so the plywood support orients the bars and sets the proper spacing. It’s essential that the first bar is perfectly centered and plumb, since all the other bars are referenced from it.
The end bars are shorter but more difficult to fit since the ends have to be trimmed to an acute angle. I used a belt sander to trim the length of both ends and fine-tune the angle. It is best to fit the steeper angle first, so the final adjustment for length is made on the end with the shallower angle.
With all the bars tack welded in place, I carefully scrutinized the grille to check for uniformity. If any adjusting is required, it’s much easier to do before the bars are finish welded.
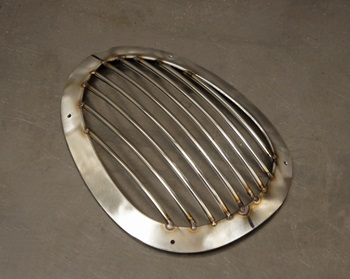
Finally, each bar is finish welded. Stainless steel is beautiful to TIG weld, since the puddle is extremely fluid. It helps to keep the heat to a minimum, which reduces distortion and oxidation. It’s important to have good shielding gas coverage, since stainless will oxidize quickly if exposed to oxygen. l like to build up a small fillet around the end of each bar, to soften the transition to the grille surround, and I do this by making several small passes.
After all bars were finish welded, I carefully sanded and filed the welds to make the fillets uniform, and a small amount of extra filling was needed to build up any low spots. I used .035-inch 308 rod for this delicate work.
I used 8-32 flat-head stainless screws to hold the grille to the nose. I countersunk the surround so the screws fit flush, and then chamfered the edges of the screw heads, and welded them into place with .035-inch 308 filler rod. After sanding the welds smooth, the grille was fastened to the nose, and the fit was checked one last time.
After the final tweaks, the grille was sent out for polishing. A nicely crafted grille like this can be the finishing touch for a classy race car or hot rod!
