On any pipe welding application, precision and quality always take precedence over speed. Using the GTAW process-though by far the most complicated and time-consuming of all welding techniques and practical only for skilled welding operators-provides not only inspection quality welds, but also the desired aesthetics for the job. One of the lesser-known techniques of the GTAW method, called cup walking, offers consistent quality welds while creating minimum operator fatigue. This article explores some of the basic considerations and techniques necessary to develop the skill of cup walking, including details regarding filler metals, cup changing and power sources.
Why cup walking?
While traditional methods of GTAW can be used for pipe welding, the constant motion required to maintain a consistent arc length and to dab filler metal in the weld puddle can become both tiring and frustrating for the operator. Continuously changing angles to accommodate for the dynamics of welding on pipe is an even greater obstacle. It requires tremendous time, patience and skill on the part of the operator to create quality welds under these conditions.
Instead, using the cup walking technique-where the nozzle of the GTAW torch rests right on the pipe with the filler metal placed in the groove the operator is welding (the specific technique of which will be discussed later in this article)-provides more arc stability and greater comfort, while also allowing the operator to change positions more easily. Aesthetically speaking, the resulting welds are far superior when created by the cup walking technique as opposed to traditional GTAW methods.
The versatility of this technique makes it an equally appealing alternative to traditional GTAW methods. Operators can cup walk on any type of pipe and most types of material except for aluminum. Because the melting temperature of aluminum is quite low compared to ferrous metals like carbon or stainless steel, cup walking on this type of material is not recommended; the hot cup of the GTAW torch leaves a trailed impression along the groove and could also pick up contaminants. The technique, however, is entirely viable for all other types of materials and piping applications, even though using it on larger pipes may be less desirable given the amount of time that would be necessary to complete the job.
Preparing for cup walking...
Like other GTAW processes, cup walking requires that the appropriate measures be taken to ensure the cleanliness of the base material. Depending on the industry for which an operator is welding the pipe, a variety of surface conditions may be present. Base metals should be wiped free of any oil or debris and/or scraped with a wire brush dedicated for use on a particular metal. The edge preparation for the pipe will also vary according to the application and welding specifications/procedures and is primarily dependent on material thickness. Most often, however, GTAW specifications/procedures for pipe applications will call for a V-groove with a feather (also called knife) edge.
For cup walking, most DC constant current power supply provides the desired results, but the more geared for GTAW welding the machine is, the better performance an operator will achieve. Pre-flow and post-flow of shielding gas, along with pulse capabilities and arc starting mechanisms all factor into the quality of weld, especially for beginning "cup-walkers." Pre-flow of shielding gas assists with consistent arc starting, while post-flow ensures that the base material does not become contaminated by the atmosphere when the operator extinguishes the arc. Further, a power source with pulsing capabilities provides better peak current values so beginners can achieve successful sidewall fusion and root passes. It also helps to control heat input on more inter-pass sensitive materials. And while Lift-Arc technology is acceptable for applications on thicker materials where there is less concern about tungsten contamination, the emergence of more exotic metals into the pipe industry brings with it an increased concern of contamination. On these types of materials, a high frequency arc start-or non-contact start-is preferable.
The specific power source settings for cup walking depends largely on the thickness of the material being welded, inter-pass temperatures and the heat input requirements of the given weld procedure. Operators need higher amperage settings for thicker materials, but for the open groove GTAW joints present on pipe, setting the power source in a range of 90 to 110 amps works well on most materials.
Typically, operators will use a 3/32-inch diameter, 2 percent thoriated tungsten when cup walking. Thoriated tungsten maintains its pointed shape-the preferred shape for this technique-better than other types of tungsten. It also has a higher carrying capacity to handle DC power sources and resists melting. Depending on the diameter of cup used, operators need to adjust tungsten stickout accordingly. Because the traditional, purist technique for cup walking involves multiple cup changes, it is important to maintain a simple rule of thumb: the tungsten should not stick out any further than the measurement of the inside diameter of the cup. For example, if a cup is a size 6 (or specifically 3/8-inches ID), then the tungsten stick out should only be 3/8 inches.
Torch options for cup walking are equally as specific as tungsten choice. Generally, operators use a 200 or 300 amp air-cooled torch. The amount of on-site work needed for pipe application requires portability and these torches eliminate the burden of carrying additional equipment for a water-cooled torch. Moreover, air-cooled torches tend to be more robust than water-cooled torches and provide the reliability needed for field applications when cup walking. That said, water-cooled torches still have their place, especially
in shop environments.
What to expect when cup walking and then what to do...
The actual cup walking technique is highly specified and, additionally, requires a tremendous amount of practice and skill on the part of the operator. Because there are many instances of gapping and out-of-roundness (which consequently causes mismatch or what is called highs and lows) on pipe applications, the operator needs to accommodate for these less than ideal circumstances. These conditions, of course, vary from industry to industry and application to application, but nonetheless, they almost always exist and are best dealt with by mastering an understanding of weld puddle dynamics. When operators encounter mismatch caused by pipe out-of-roundness, they need to pull the weld puddle to the high side of the joint to ensure that not too much time is spent welding on the low side of the joint. Spending too much time on the low side can lead to excessive root reinforcement (also called excessive drop or root build up) and results in too much weld penetration, cold lap and improper tie in or fusing of the two pieces of pipe.
To begin, it is important to align the pieces of pipe as well as possible and tack them up to make certain that they do not shift while welding. Techniques for tacking depend on the pipe's size, but can usually be done with four to six 1-inch long tacks as demonstrated in Fig. 1. Upon completion of the tack, operators should grind the tack to a feathered edge to assure that solid tie-in is achieved during the root pass procedure.
 |
| Fig. 1 Tacking the pipe before welding, using the GTAW method (as shown here) is the first step in cup walking. The technique for tacking up the pipe will depend on the location and size of the pipe and/or the application. |
It is then necessary to choose the appropriate diameter of filler metal for the specific groove joint. The diameter of the filler metal should be slightly larger than the gap of the pipe and, while resting against the saddle of the hand, should press against the groove without pushing through. For example, a 1/8-inch filler metal diameter would be appropriate to use on a 3/32-inch groove.
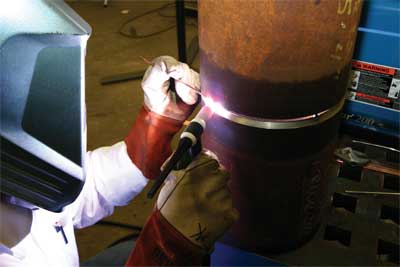
Holding the filler metal gently against the pipe, operators should angle the torch so that the back of the cup is touching the pipe with the tungsten just slightly above the surface of the groove/work piece (see the demonstration in Fig. 2). Depending on the joint configuration, operators need to adjust the size of cup used for the root pass, but in most cases (and for the sake of this discussion), a number six (3/8 inch) cup would be appropriate. The cup should be rested in the groove, making contact on both sides of it-two-point contact-while the torch is moved back and forth slowly in a zigzag motion. Operators generate this motion by a swaying the arm (instead of the wrist), to reduce operator fatigue and help create a steadier weld.
 |
| Fig. 2 Titlting the torch back while resting the cup on the groove, as shown in this demonstration, is an essential part of learning the cup walking technique of the GTAW process. |
By applying slight pressure to the torch, the operator can continue the zigzag motion up the groove, "cup walking" from the bottom (6 o'clock) to the top (12 o'clock) of the pipe. During the course of moving upward, operators should keep the filler metal at the leading edge of the weld puddle, as opposed dipping it into the weld puddle as with traditional GTAW welding applications.
The best way to ensure the highest probability of success on the root pass (Fig. 3) is to look for what has been termed the "devil's eye." The "devil's eye" is a fluid dot in the center of the weld puddle that is formed by foreign (but not worrisome) elements, such as silicon on a mild steel application, which continuously dances around in the weld puddle. If an operator sees the "devil's eye," it is insurance that the torch angle, travel speed, root opening and filler metal are properly positioned and that he has adjusted the amperage setting correctly. If the operator does not see the "devil's eye," it is a sign that one of the physical variables is not correct and should be adjusted accordingly.
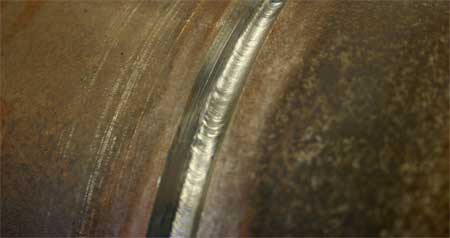 |
| Fig. 3 An example of a root pass created with a number six cup using the cup walking technique. |
For fill passes, use a number six or seven (7/16 inch) cup, depending on the thickness of the root pass. On hot, thin root passes where maximum root reinforcement has been achieved at the backside of the weld, operators could continue to use a size six cup for the first fill pass, while also maintaining the two-point contact (as with the initial root pass) of the cup on either side of the groove. Conversely, if an operator ran a cool, heavy root pass with minimum root reinforcement, then switching to a number seven for the first fill pass would be more appropriate. Regardless of the cup size used on the first fill pass, operators should use a number seven (or larger cup, depending on the size used initially) for the second fill pass.
When creating either a first or second fill pass with a number seven cup, the technique for "walking" up the groove is slightly different than with the root pass-a three-point contact is now made with the groove instead of a two-point contact. Specifically, the cup should be touching the root pass and pivoted so as to be guided by the edges of the groove. Doing so will cause the cup to touch three points of the weld face as it is slowly zigzagged upward. If a third fill pass is necessary, using a number seven cup will continue to work. Finally, for the cap pass, a number eight cup (1/2 inch) provides adequate gas coverage and the weld face width needed for quality and precision welds. During the cap pass, the torch should only make single-point contact, pivoting carefully on the weld face as it is moved upward.
During each of these passes, it is important to maintain only slight pressure on the filler metal and to ensure that it is tangent, or at an angle to the pipe. If the operator holds the filler metal too perpendicular to the pipe or applies too much pressure, then the filler metal could push through the root opening of the pipe. Similarly, if the operator holds the filler metal too far in front of the arc, there is a risk that he will push into the tungsten and contaminate the weld.
These and other "pitfalls," such as the slowness of the cup walking technique (due not only to the GTAW process in general, but also the need for cup changing) may cause operators to avoid the process; however, the advantages far outweigh the potential problems. The aesthetics of this technique, like that of most GTAW welding procedures, are far more appealing than with other processes like Stick (SMAW) or GMAW, and also provide the precise quality of welds needed for critical pipe applications. With the appropriate training and practice on the part of the operator, learning to walk-the-cup can become an invaluable skill and application for a wide range of industries.