MIG Basics for Automotive Welding Repair
Andy Weyenberg
Aftermarket and Performance Manager, Miller Electric Mfg. LLC
What are the benefits of MIG welding?
MIG welding is a versatile process that can be used to weld most common automotive metals, including carbon steel, stainless steel and aluminum. It is particularly more forgiving on thin metals, making it ideal for automotive repair work. MIG welding is capable of handling a wide range of automotive repair tasks from 24-gauge up to 1/4-inch thick. This versatility makes it suitable for most welding work, including body panels, which typically involve thinner material, as well as structural parts, like the frame, that require welding thicker materials. One key benefit of MIG welding is the ability to achieve greater speeds, which reduces the time spent on repairs. The continuous wire feed of MIG welding minimizes stops and starts, contributing to more consistent and efficient welds.
By following some basic welding tips, you can achieve a good quality weld with MIG welding in auto repair applications.
Getting started with automotive welding
It’s a good idea to get comfortable with the welder and complete some practice welds on scrap metal similar to the material and project type you’ll be working on. That way, you can optimize your technique to achieve a proper weld. While auto repair work typically involves welding steel on the body and frame, aluminum is becoming more common in bodies and substructures. Stainless steel is also used in the fabrication of exhaust systems, fuel tanks and other components that require resistance to corrosion, and some components or sub-structures may involve welding on high-strength low alloy steels.
Ensure that the surface of the base material and the joint are as clean as possible and check to make sure there is a good work clamp connection. Joint preparation is required on thicker material. Beveling the joint will ensure proper penetration of the base metal, which is especially important for butt joints.
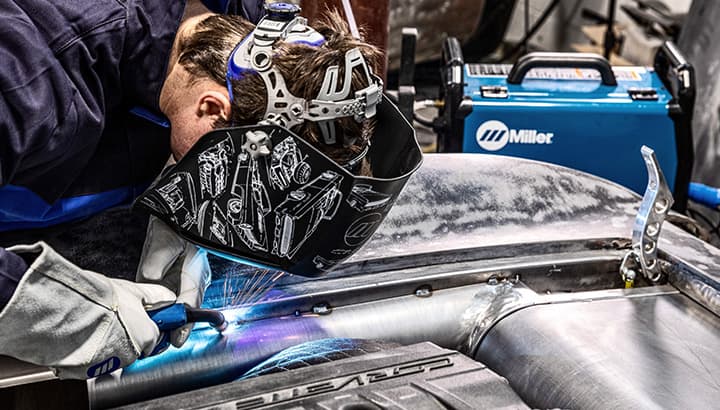
Before tackling any project, make sure to have the appropriate safety gear, including eye protection and a welding helmet. Miller offers a wide range of helmet options, apparel, safety glasses and accessories to keep you safe while welding.
Equipment preparation
There are numerous tips to keep in mind when selecting the proper equipment and consumables for the welding application. This includes choosing the most appropriate wire and gas and knowing the power needs of the repair and your machine’s capabilities.
Wire selection
To select the proper wire, be sure to match the wire type to the base material. Use the correct alloy of aluminum wire for the aluminum base metal alloy, and the same applies to stainless steel. If you’re unsure about the base metal alloys, check with the manufacturer. Some wires are better suited for welding dirty or rusty steel because they contain more oxidizers. Always read the manufacturers’ recommendations for each wire type. The best filler metal for the job depends on the specific requirements of the welding application, the base metal being welded, the thickness of the metal and the welding process being used.
For example:
- ER70S-6 is a common wire and offers medium deoxidizing performance
- ER70S-2 filler metal has more deoxidizers
- ER70S-3 filler metal has less deoxidizers
- 023-024 wire size is best for body panels and thickness up to 1/16"
- 030 size wire is better for 20 gauge to 1/8"
- 035 wire is good for 16 gauge to 1/4"
Shielding gas selection
A shielding gas blend with 75% argon/25% CO2 (also called 75/25 or C-25) provides the best overall performance for MIG welding. It produces the least amount of spatter and best bead appearance, and it won’t promote burn-through on thinner metals. A 100% carbon dioxide shielding gas will provide deeper penetration but increases spatter and results in a rougher bead compared to 75/25.
Setting parameters
It’s important to know the requirements and capabilities for the application. How much voltage and amperage a weld requires depends on several variables, including metal thicknesses and type, joint configuration, welding position and shielding gas, as well as wire diameter and speed. Miller® machines provide a convenient reference chart, located on the inside of the door accessing the wire feed system, to help determine voltage and amperage. Machines with the Auto-Set™ feature, found on several Millermatic® and Multimatic® models, offer a simpler process for setting proper voltage and wire speed. Simply select the MIG wire diameter you are using, dial in the thickness of the metal and the machine will automatically set the proper voltage and wire feed speed.
Basic welding techniques
Once the proper wire and shielding gas are selected, there are some basic welding techniques to keep in mind to help achieve the best results.
Wire stickout
Stickout refers to the length of unmelted wire that extends from the end of the contact tip. The proper wire stickout should be around 1/4 to 3/8 of an inch from the contact tip. For tight joint access, such as when welding inner body panels, inside corners, pillars, roof rails and floor pans, a slightly longer stickout may be necessary. One good rule of thumb is to listen for a sizzling bacon sound; if the arc sounds irregular, one common culprit could be too long of a wire stickout. Also keep in mind that changing the distance between the contact tip and the workpiece causes voltage to vary and changes the shape of the weld bead, so don’t hold the gun too far away from the material being welded. If you need to run a longer wire stickout, you may need to set your voltage and wire feed speed higher to compensate for the additional length of wire.
Push or pull?
The push technique involves pushing the gun away from (ahead of) the weld puddle. Pushing usually produces lower penetration and a wider, flatter bead because the arc force is directed away from the weld puddle. In common automotive repair welds, use the push technique for welding thin material such as sheet metal or body panels. In considering gun travel for MIG welding, the push technique is the most recommended, since it gives you a good view of the weld joint.
With the pull or drag technique, the welding gun is pointed back at the weld puddle and dragged away from the deposited metal. Dragging typically produces deeper penetration and a narrower bead with more buildup. The pull technique is most often used for thicker materials like the frame. While it offers a better view of the weld puddle, it provides less visibility of the joint.
Tips for various welding positions
The travel angle is defined as the angle relative to the gun in a perpendicular position. Normal welding conditions in all positions call for a travel angle of 5 to 15 degrees. Travel angles beyond 20 to 25 degrees can lead to more spatter, less penetration and general arc instability.
The work angle is the gun position relative to the angle of the welding joint. The recommended work angle varies with each welding position and joint configuration. Consider these guidelines for different welding positions:
Flat weld position
Flat position welds are used frequently for body panels, floor pans and some frame repair, as well as for welding new sheet metal onto existing panels.
Butt weld (a 180-degree joint): Hold the gun at a 90-degree angle to the workpiece, directing the filler metal straight into the joint with a travel angle of 5 to 15 degrees. A small back-and-forth motion with the gun can help fill a large gap or when making multiple passes. A slight pause at the side of the weave bead can help avoid undercut. On thin body panels, a spot or spot stitch weld while moving around the panel will help keep heat soaking and warping to a minimum.
T-joint or fillet weld: Keep the gun at a 45-degree angle or equal distance from each piece. Adjust the work angle slightly when making multiple passes to avoid uneven weld beads and undercuts. T-joints are used for substructure reinforcements, rocker panels and frames.
Lap joint (also a fillet weld): Angle the gun between 60 and 70 degrees. The thicker the metal being welded, the greater the angle. Lap joints are used for substructure reinforcements, rocker panels and frames.
Plug welds: Perform these welds perpendicular (at 90 degrees) to plug the weld hole. Use a small circular movement if needed to make sure the bottom and top material are properly fused.
Horizontal weld position
Horizontal position welds are often used to join frame rails in auto repair. Because of the effects of gravity, the gun work angle must be dropped slightly by 0 to 15 degrees. Without changing the work angle, the filler metal may sag or roll over on the bottom side of the weld joint. The travel angle, whether using a push or pull technique, generally remains the same as for a weld joint in the flat position.
Vertical weld position
Vertical welds are frequently used on frame sections, suspension mounts or for welding pillars or rocker panels. Vertical welding, both up and down, can be difficult, so pre-weld setup is important. Consider reducing the voltage and amperage 10 to 15 percent from the settings you would use for the same weld in a flat position.
Vertical down welding technique: Usually easier to execute because the weld puddle is more visible. When welding thin metals, keep the wire on the leading edge of the weld puddle. A slight weave may help flatten the weld crown. If non-structural, a spot stitch could work as well.
Vertical up welding technique: Use a 5 to 15 degree drop from the perpendicular position. A slight weaving motion can help control the size, shape and cooling effects of the weld puddle.
Overhead weld position
Overhead welds may be needed to weld anything on the underside of the vehicle, such as the exhaust system. This is the most difficult welding position and should be avoided when possible. If you need to weld in the overhead position, reduce welding parameters by a minimum of 10 to 15 percent and try to maintain a faster travel speed to avoid having the weld pool fall from the joint onto you. Because most automotive applications involve welding thinner materials, smaller stitch welds or spot-stitch welds will reduce puddle droop.
Choosing the best welder for your auto repair needs
When choosing a welding machine to meet your auto repair welding needs, it’s important to consider the types and thicknesses of metal you will weld most often, as well as your level of expertise. Whether you’re a beginner or a professional, there are machines designed to meet your specific needs.
For beginners
- The Millermatic 142 with Auto-Set is an all-in-one wire welder that welds 24-gauge to 3/16-inch mild steel in a 120V, easy-to-use package.
For professionals
- The Millermatic 211 PRO Auto-Set with Multi-Voltage Plug (MVP™) technology welds from 24-gauge to 3/8-inch-thick material in a single pass, and MVP technology allows you to connect to common 120- or 240-volt power receptacles without using any tools.
- The Millermatic 252 offers the highest duty output in its class and can weld material from 22-gauge to 1/2-inch thick in a single pass. The machine has no-tool, quick-change reversible drive rolls and an easy-to-set, scaled tension knob.
- The Millermatic 255 is an all-in-one welder that connects to 208- or 240-volt input power. With a color screen featuring Auto-Set Elite technology and pulsed MIG, this machine welds up to 1/2-inch aluminum, stainless and mild steel.
For versatile applications
- The Multimatic 215 PRO is a versatile MIG, stick and DC TIG welder with a color screen featuring Auto-Set Elite technology. This all-in-one welder connects to 120- or 240-volt input power and welds up to 3/8-inch mild steel.
- The Multimatic 220 AC/DC multiprocess welder is the only machine in its class that offers users the ability to switch welding gas, polarity and welding process automatically while recalling the last MIG or TIG settings. It connects to 120- or 240-volt power.
Choices to suit many automotive welding applications
For automotive welding repair, you can create good, high-quality MIG welds with a combination of practice and following basic techniques and tips.
For more information on machine options and accessories or to purchase any of the machines mentioned in this article, visit your local welding distributor.