(This article first appeared on www.thefabricator.com)
 |
|
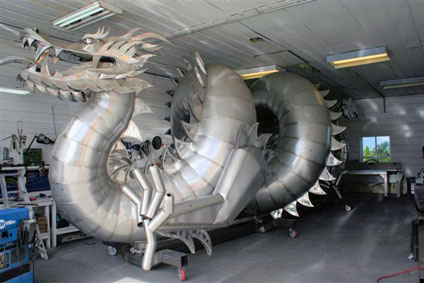
Kevin Stone’s “Chinese Imperial Water Dragon” slowly takes shape in his studio. The Sculpture will use approximately 3,600-sq-ft. of 304 stainless steel and be priced at over $1 million.
|
A few years ago, Kevin Stone, a senior fabricator, decided to combine his years of welding experience with his innate artistic ability and began creating stainless steel sculptures on a large scale. While people make the pilgrimage to Stone’s yard in Chilliwack, B.C., to see the “Power of Flight,” a 12-ft. tall, 18-ft, long stainless steel eagle with a 41-ft. wingspan, Stone is busy inside his studio working on his latest project: an 85-ft. long Chinese dragon.
With price tags of over $3 million, Stone’s sculptures are designed to weather the elements and never lose their shine. His objective is to create “Shock and awe artwork…Beauty on a large scale.” To achieve this vision, he works with stainless steel, which he considers to be one of the more difficult metals to work with.
"Very few people can weld thin stainless,” Stone says. “It will oxidize quickly, overheat and burn through. It requires polishing to bring out its beauty and it is very labor intensive. Very few people work with it. However, it's worth the effort. Once it's polished, it can be out in the elements and it won't corrode, rust or lose its mirror-like quality. My vision is for my sculptures to be mounted over water to bring out the reflective qualities and use colored lights for effect."
About 14 months into the “Chinese Imperial Water Dragon," Stone has already used 1800 sq. feet of 16-gauge, 304 stainless steel and expects to use another 1800 sq. ft. before he’s done. (See http://www.metalanimation.com)
When beginning a new sculpture, Stone conducts some preliminary research and design, but he builds primarily from his imagination. “I have a blueprint in my head that I follow,” he says. “I visualize five to ten steps ahead of what I'm working on. I picture what the overall shape will be and try to think of something that will fit inside that shape, yet be structurally strong."
 |
Maintaining the proper heat input is crucial when welding stainless. Five amps too much can change the metal’s properties.
|
To help with fit up and save both time and wasted material, Stone first works out the detail on paper. After he finishes one piece of stainless, he’ll cut a piece of paper to represent the next piece and ensure it fits perfectly before transferring it to a piece of stainless.
Stone shapes the pieces by hand and then tack welds them into place with his Miller Dynasty® TIG welder. He first places the welds several inches apart. When Stone is happy with the fit up, he'll add more tack welds between the existing welds until there are welds about every half-inch. He'll eventually finish-weld the pieces together, welding a 10-in. section in one place and then move somewhere else. This helps to keep down the heat input and to ensure proper fit. He'll finish by grinding down the welds and polishing the pieces.
When he first turned to sculpture, Stone had his choice of welding equipment and decided to use the Miller Dynasty AC/DC TIG welder. "I just love the machine and its controllability," Stone says of the Dynasty. "It has a nice arc start, so I can start off slowly and still have good heat control. With my sculptures, there are few welds in a flat position. I weld in the most awkward positions, conditions and shapes you can imagine. This level of control and reliable arc starts makes the Dynasty ideal for what I do."
For the 16-gauge material he works with, Stone usually sets his Dynasty to 160 amps and prefers a thumb control rather than a foot control. He also chose a water-cooled torch because it keeps his hand cool and allows him to use a smaller torch.
 |
Notice the narrow heat affected zone (HAZ) created by high speed pulsed TIG, which helps preserve the metal’s original properties.
|
Other than picking the right equipment, Stone has some advice for the aspiring metal sculptor.
"Practice your trade skills," he advises. "I have 18 years of welding experience, which allows me to weld stainless. It's not easy and takes a lot of practice. If you're doing any artwork, practice drawing. It helps you visualize. Drawing can actually help sculpting dramatically because it helps lock in and define your vision."
Stone also noted two common mistakes by people who TIG weld. “To become more steady, many people tend to hold their breath, but this can have the opposite effect. Relax and breathe normally. Also, a gentle grip makes for a steadier hand. Hold the torch firmly but not too tightly or fatigue will set in and lead to shaking.”
The Art of TIG Welding
When TIG welding stainless, whether for a sculpture or on the job, there are a few other points to keep in mind to achieve a cosmetically appealing and sound weld. Because stainless steel does not adequately dissipate heat, maintaining proper heat input when welding is critical. Too much heat can lead to warping, embrittlement or rust. As little as five amps too much can damage stainless steel’s properties. There are, however, several ways to control heat input:
Good fit-up. Adding filler metal to fill gaps puts more heat into the part, so good fit-up is important. It’s impossible to add a lot of filler metal and keep energy out of the part.
The correct filler metal. The filler metal diameter should be thinner than the base metal. If it’s thicker than the base metal, too much heat is needed to melt the filler metal. The filler metal should also match the base metal alloys in order to maintain consistent mechanical and corrosion properties.
Choose the right tungsten size. You can’t weld precisely on 1/16-in. material with a 1/8-in. tungsten. Use the right tungsten diameter based on your amperage. Check the manufacturer’s recommendations for the proper size.
Use the correct tungsten geometry. The tungsten’s shape plays a role in the weld’s width and penetration. In welding stainless steel, the sharper the tungsten, the wider and less penetrating the bead will be. On a sharper point, (ground to a taper length that is more than 2½ times the electrode diameter), the arc tends to fan out, creating a wider heat affected zone. With a blunter point (less than 2.5 times the electrode diameter), the arc comes straight down with less flaring for a deeper, thinner bead and thinner heat affected zone.
Use a fingertip or foot control. You need to be able to start the arc and adjust the amperage from the beginning to the end of the weld. Set the welder to the desired amperage, which should be just a bit more power than you’ll need. If your welder is fairly accurate, you’ll only need to adjust the fingertip or foot control a little bit to adjust welding output.
 |
A fingertip control allows Kevin Stone to precisely control amperage.
|
Start with low amperage and allow the puddle to form. Then back off two or three amps and add filler.
Maintain the correct puddle size. The weld puddle should be the thickness of the base metal. If the puddle grows too large, turn down the heat.
Eliminate craters by easing down the current at the end of the weld and adding filler metal until the puddle solidifies. Use your torch’s fingertip or foot pedal control or your welder’s sequencer.
Keep the gas flowing and directed at the puddle until the orange color fades. The post flow also cools the puddle and the tungsten. Moving the torch too fast can blow gas away from the tungsten, turn it black and make it more difficult to start next time.
Use pulsing. To control heat input, use a welder with DC pulsing capabilities. In pulsing, the current transitions between a high peak amperage and a low background amperage that maintains the arc but allows the puddle to cool. The peak current provides good penetration, but the background current allows the weld puddle to cool slightly, preventing warping, embrittlement and carbide precipitation.
Pulses per Second (PPS) is simply how many times the machine will complete one pulsing cycle in a time span of one second. Increasing the number of pulses per second produces a smoother ripple effect in the weld bead, narrows the weld bead. Reducing the number of pulses per second widens the weld bead. Pulsing also helps agitate the puddle and release any porosity or gas trapped in the weld.
Some beginning TIG welders use a slow pulsing rate (perhaps .5 to 1 PPS) to help them develop a rhythm for adding filler metal. For welding carbon or stainless steel, use a rate of 100 to 500 PPS. Start at 100 and work upward. Higher pulsing (generally above 100 pulses per second) increase puddle agitation, which in turn produces a better grain molecular structure within the weld. High speed pulsing also constricts and focuses the arc. This increases arc stability, penetration and travel speeds, and it produces a smaller heat-affected zone.
 |
Kevin Stone turned his years as a fabricator to the world of sculpting to create art on a large scale.
|
High speed pulsed TIG requires using a TIG inverter, such as Miller’s Dynasty® series. Conventional TIG technology limits pulsing to a relatively narrow range of .25 to 10.0 pulses per second (PPS), where inverter technology enables pulsing at up to 5,000 PPS.
One final tip: As Stone advises, practice, practice, practice. Check your settings and technique on a test piece beforehand. TIG welding stainless steel is an art, but it’s one that can be learned and enjoyed.
To learn more about Kevin Stone and his other projects, check out TIG Welding Takes Wing.