
Article
Next Generation Welding Helmets Offer Benefits for Operator Comfort and Productivity
Advanced welding helmets enhance safety, ensure compliance, and improve comfort, helping reduce fatigue and increase productivity on the job.
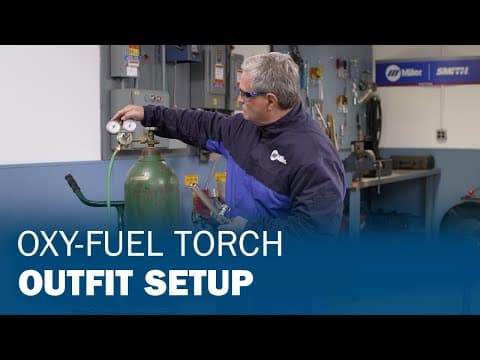
How To Safely Setup an Oxy-Fuel Torch Outfit
Inspect cylinder valves for damage and the presence of oils or grease. This is especially important for oxygen cylinder connections due to the increased risk of combustion or explosion when you’re exposing concentrated oxygen gas to flammable materials. Additionally, make sure cylinders are secured to a stationary support or cylinder rack to prevent falling or tipping.
Damage to O-rings and other seating surfaces can lead to improper fits and gas leaks, impeding work quality and compromising safety.
Both of these components add another layer of safety when using an oxy-fuel torch.
Reverse flow check valves should be installed in the system either on the regulator or on the torch handles. Check valves are designed to prevent the unintentional backflow of gases into the torch, hoses or regulator. They do not stop the spread of flame upstream or flashback. Check valves need to be tested and changed periodically.
Flashback arrestors are designed to stop a flame from going beyond the point where the device is installed. Most flashback arrestors have a built-in check valve for added safety. Flashback arrestors can and will create some gas flow restrictions, so make sure the unit can supply enough gas flow to support the tip being used, because insufficient gas flow can cause equipment malfunctions. Like check valves, flashback arrestors must also be tested and changed periodically.
You will use either reverse flow check valves or flashback arrestors (but not both) in the same system. When you do install these safety devices, make sure you are installing them in their intended locations; otherwise, the flow of gas will be blocked.
The combustion process consumes oxygen and produces carbon dioxide. Inadequate ventilation can lead to oxygen depletion and excessive carbon dioxide buildup, potentially creating respiratory problems for the operator. Proper ventilation also helps dissipate exhaust gases and the high heat generated from the torch while working.
An oxygen connection riddled with dust or oil can be hazardous. The heat created by recompressing oxygen in the regulator can cause dust or oil to burn, which could lead to a regulator burnout or explosion.
Note: Do not open or “crack” the acetylene cylinder valve to blow debris from the valve outlet. Instead, remove debris using nitrogen, air or a clean, oil-free rag.
Pressure regulators are control devices used to monitor and reduce high pressure to the desired working pressure. When attaching the oxygen regulator, position it at a slightly upward angle. That way, in the event that the screw blows out of the bonnet, it will project up and away from the cylinder.
Before connecting the regulator to the gas cylinder, make sure that the connection is clean. Each type of gas uses a different type of connector, so make sure you’re using the one that’s appropriate for your fuel.
Inspect hoses for worn or damaged areas before installing them. If there’s visible damage, replace them immediately. Hoses are generally color-coded: green are for oxygen and have a right-hand threaded connection. Fuel hoses are red in color and have a left-handed threaded connection. T-grade hoses can be used for any fuel gas, including acetylene and alternate fuels, but R- and RM-grade hoses are for acetylene only.
To start, make sure both torch valves are closed and both regulator adjusting screws are in the out/off position. Then, open the oxygen cylinder valve slowly to allow the regulator to pressurize gradually. This will minimize the heat of recompression generated inside the regulator. Once pressurized, open the oxygen cylinder valve fully. Oxygen cylinders are fitted with double seating valves, so opening the valve all the way helps prevent leaks and facilitates maximum available gas flow. Adjust the delivery pressure to approximately 10 PSIG.
Next, open the acetylene cylinder approximately ¾ of a turn. Alternate fuel cylinders (e.g., propane, propylene) can be opened fully. That’s enough to provide sufficient fuel flow but can easily be turned off quickly in case of an emergency. Then, adjust the fuel gas delivery pressure to 10 PSIG.
This is something that should be done with an approved leak test solution or oil-free soap and water. Using a brush, apply solution generously to all connections, fittings, hoses and joints of the torch and the associated equipment. Slowly open the oxygen and fuel gas cylinder valves one at a time and watch for the formation of bubbles in the applied solutions. Bubbles indicate a gas leak, and the size and frequency of the bubbles can help determine the severity of the leak. If a leak is found, shut off the cylinder valve associated with the leak and try tightening the connection. If the leak persists after tightening, the equipment should be taken out of service immediately and repaired.
There’s another way to leak test connections after pressurizing the system — which involves closing both torch and cylinder valves completely and watching the delivery pressure on both regulators to see whether there is a pressure drop.
Pressure requirements vary by tip size, style and manufacturer. Before lighting the tip, it’s important to set the regulators and purge oxygen and the fuel gas from the system to prevent a mixed-gas explosion. Open the oxygen valve a quarter of a turn first, allowing it to pass through the torch for three to five seconds, then close the valve. With the oxygen flowing, set the recommended pressure on the oxygen regulator. Repeat the process for the fuel gas.
Smith torch tip charts can be found in the manuals supplied with every torch or at millerwelds.com.
While an instruction manual is the definitive guide for preparing to use your oxy-fuel torch system, these 10 at-a-glance checks will help ensure you’re executing the right setup before rolling up your sleeves and getting to work.
You can also sign up to receive our ultimate guide to oxy-fuel to learn more.
Advanced welding helmets enhance safety, ensure compliance, and improve comfort, helping reduce fatigue and increase productivity on the job.

Learn how to outfit your welding operators with the best protective clothing and accessories to avoid heat stress — which can lead to a number of health concerns.
Reduce heat stress and boost welding performance with cooling gear like CoolBand™ and CoolBelt™, offering comfort, efficiency, and quick ROI.