Article
Getting Started With TIG Welding MIG vs TIG Welding Equipment and Process
Learn the key differences between MIG and TIG welding, how the process changes when switching to TIG and how the right equipment helps build confidence and control.

Andrew Pfaller
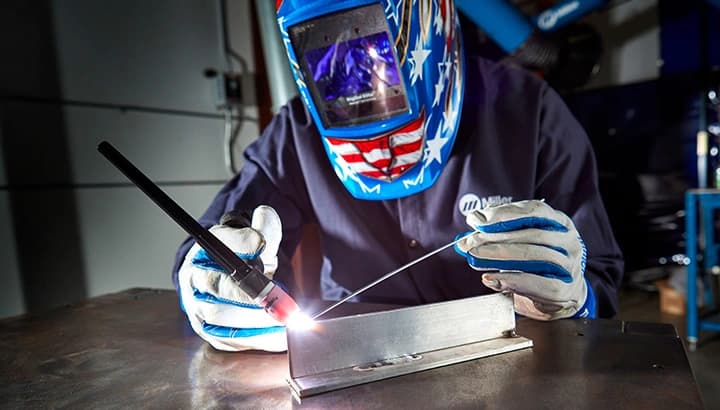
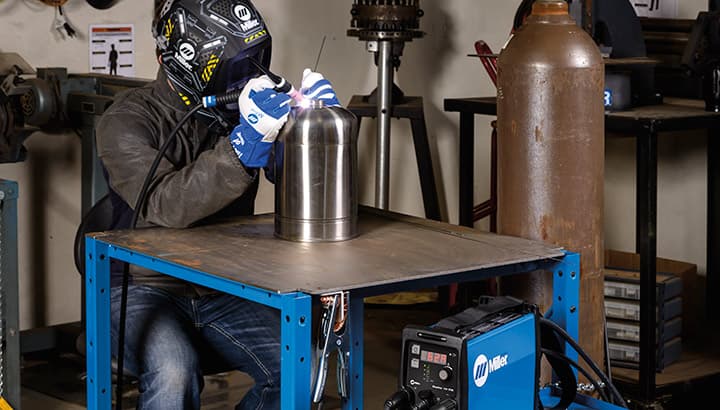
In TIG welding, a non-consumable tungsten electrode in a handheld torch — powered by machines like Miller® Dynasty® or Maxstar® welders — heats the metal while a shielding gas (commonly argon) protects the weld from contamination. Filler metal is added with a separate rod as the weld progresses.
Because TIG welding requires the use of both hands, operators often rely on a foot pedal or a torch-mounted amperage control to start, adjust and stop the flow of current.
There are several benefits that TIG welding can provide when compared to other welding processes. These benefits include:
The TIG process can weld more metals and alloys than any other process. TIG welders can be used to weld steel, stainless steel, chromoly, aluminum, nickel alloys, magnesium, copper, brass, bronze and even gold. The TIG process can be used to weld everything from bike frames to door handles to automotive parts.
With superior arc and weld puddle control, TIG welding creates clean welds — ideal for projects where appearances matter, such as aerospace and custom automotive work. Because the heat input is often controlled with a foot pedal or fingertip control, TIG allows you to heat up or cool down the weld puddle, providing precise weld bead control.
Unlike MIG welding, TIG welding produces no sparks, spatter or slag, so there’s nothing to clean between passes. Because only the necessary amount of filler metal is added and the weld puddle is protected by argon shielding gas, TIG welding delivers a smooth, contamination-free finish.
Argon can be used for all TIG applications, for all metals and thicknesses. This streamlines gas maintenance in the shop or manufacturing facility. While it is possible to use helium or specialty blends, these are not typically necessary.
TIG welds can be made in all positions — flat, horizontal, vertical and overhead — so TIG is perfect for welding roll cages or out of position.
Choosing a TIG welder — whether that’s a compact inverter like a Maxstar or an AC/DC system like a Dynasty — can be an exciting endeavor, but for some it might be overwhelming.
Here are a few considerations that can help guide you in selecting a suitable product for your needs.
Start by identifying the materials you plan to weld.
Most welding power sources can handle common material sizes, but it’s important to match the machine to the thickness you’re working with.
Before choosing a machine, consider the power available at your worksite. If your available power doesn’t match the machine’s requirements, it can limit your options. For example, a high-amperage TIG welder may need three-phase power, which isn’t always accessible in smaller shops or residential settings.
Portability is critical for certain applications. Historically, welding equipment was large and heavy, limiting mobility. With advancements in inverter technology, modern equipment has been designed to eliminate the size and weight barriers and provide the ability for a person to carry it or easily move with a cart accessory.
Finally, several other use-case factors are grouped together, so it’s helpful for you to identify as either a personal user, small business or heavy user.
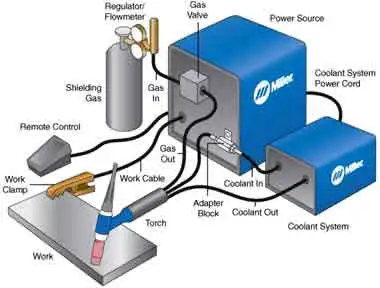
Before starting, always read and follow your machine’s Owner's Manual and precautionary labels for complete safety, setup and installation instructions and procedures. The following diagram and instructions show a typical TIG welding system and connections.
When using an air-cooled or water-cooled torch, use the adapter from your accessory package and plug the torch into the front of your machine. Also connect your gas hose and regulator.
Plug in your foot pedal or fingertip control to the machine.
Plug in your work clamp (also called a ground clamp) into the machine. Clamp the other end to your workpiece or worktable.
Grind your tungsten to a point using a 200-grit or finer wheel (designed for tungsten only to avoid contamination). When welding on aluminum, the tungsten will form a ball — repoint if it grows to the same diameter as your tungsten. Grind in the long direction and make the point roughly two and a half times as long as the diameter. Watch this video on tungsten prep:
Loosen the back cap and remove the 3/32-inch diameter tungsten from your torch. Remove the nozzle and copper collet pieces, then reinstall the collet and collet body into the torch and tighten. Put the nozzle back onto the torch.
Place the tungsten into the collet, leaving about 1/8 to 1/4 inch exposed (not more than the nozzle diameter which is also called the cup). Tighten the back cap.
Make sure the power supply you are connecting to matches the rating of your machine (see rating label on unit). If your machine is supplied with a plug, connect to the correct outlet. You may need to purchase a plug to match your receptacle. If your machine is not supplied with a plug, follow the Owner's Manual for wiring instructions.
Tungsten size, type, and preparation can have a significant effect on the weld quality.
When selecting tungsten, consider:
Each tungsten alloy is identified by a color band painted on one end.
Ron Covell explains the different TIG tungsten options.
Always check the Owner’s Manual for complete safety precautions and procedures, and make sure you have the necessary safety equipment and appropriate clothing for welding. Here are a few TIG welding basics to help you get started:
Hold the TIG torch in your hand at a 70- or 80-degree angle. Raise the torch so that the tungsten is off the workpiece no more than 1/16 to 1/8 inch. Don't let the tungsten touch the workpiece or it will contaminate your material and you will need to regrind your tungsten.
Practice controlling the heat with the foot pedal to see the weld puddle increase and decrease. Ideally, you want your weld puddle to be about 1/4 inch wide. Keep your puddle size consistent so it doesn't grow, shrink, spread or narrow while you are welding.
Pick up your filler metal in your other hand so it rests horizontally at a 15-degree angle from the workpiece — not pointed down. Heat up the base metal and gently dab the filler into the puddle. Dab in a quick, controlled manner so you don't leave large deposits.
To dive deeper into TIG welding best practices, read our full guide, "Welding Tips: The Secret to Success When TIG Welding."
Even seasoned welders experience challenges. If you run into issues while TIG welding, these common issues and solutions can help you get back on track.
If your tungsten is melting into the weld puddle, use less current or use a larger tungsten size. Avoid touching your tungsten to the weld puddle — keep it 1/16 to 1/8 inch above the workpiece to prevent contamination.
If your tungsten is burning back or melting, it usually means too much heat is concentrated on the electrode or the shielding gas isn’t protecting it properly. This can happen for several reasons, including incorrect polarity, poor gas coverage or using the wrong tungsten size for your amperage. Even your machine settings — like balance control on AC TIG — can play a role. Here’s what to check:
Porosity and poor weld color usually mean contamination or gas issues. Before welding, check these key areas:
Yellow powder or smoke usually means your shielding gas or setup needs attention. Here’s what to check:
On aluminum, a tungsten that has been contaminated with steel and simply reground can also cause the rust color/discoloration near the welds due to the vaporization of the steel contamination from further up the tungsten.
An unstable arc usually points to setup or contamination issues. Start by checking these:
For DC TIG welding:
For AC TIG welding:
This issue may be caused by an incomplete weld circuit or a lack of shielding gas. Check all cable connections and check for gas flow at the end of the torch. Also see if the gas cylinder is empty or the shut-off value is closed.
Arc wander usually means your arc isn’t focused or your tungsten prep is off.
For DC TIG welding:
For AC TIG welding:
If your arc won’t start or is hard to strike, it’s usually a setup or connection issue. Here’s what to check:
For DC TIG welding:
For AC TIG welding:
Want more tips? Check out this guide for a complete troubleshooting walkthrough.
Success with TIG welding starts with the basics: proper material preparation and the right tungsten selection. Combine these fundamentals with best practices and you’ll avoid many common issues. When problems do arise, knowing how to troubleshoot quickly will keep your welds consistent and high-quality. With preparation, attention to detail and a solid troubleshooting approach, you can achieve the results you want every time.
Posted Jan 8, 2026
Learn the key differences between MIG and TIG welding, how the process changes when switching to TIG and how the right equipment helps build confidence and control.
Learn the basics of TIG welding in motorsports applications and the proficiency of a TIG welder on aluminum and chrome-moly.
Pulsed TIG welding gives you better control of heat input, warping and arc stability on stainless steel — improving first-pass yield and lowering costs.