Article
Understanding Laser Welding Capabilities for Aluminum Applications
Learn how modern handheld laser welding systems overcome aluminum reflectivity and heat challenges for consistent welds.
Dirty aluminum sets you off on the wrong foot before you ever strike an arc. Take these cleaning/prep steps for the optimal welding of aluminum.
A welding solutions specialist with a local welding supply, when recently asked what the most important factor was for a successful aluminum weld, replied “clean, clean, clean, clean… and clean.” Welding aluminum poses its own unique set of challenges. Trying to weld with dirty base and filler metals adds unnecessary difficulty and can lead to poor weld quality. Removing the natural oxidation layer that occurs with aluminum is also an important step during pre-weld cleaning. Suitable preparation prior to welding is important — especially when fabrications are necessary to meet the weld quality requirements of industry codes, such as AWS D1.2 that governs the structural welding of aluminum.
There are key steps you can take in the treatment and preparation of filler and base metals to ensure that you don’t face problems associated with dirt, grease and airborne shop dust — as well as the natural oxidation process that takes place when aluminum is exposed to the air.
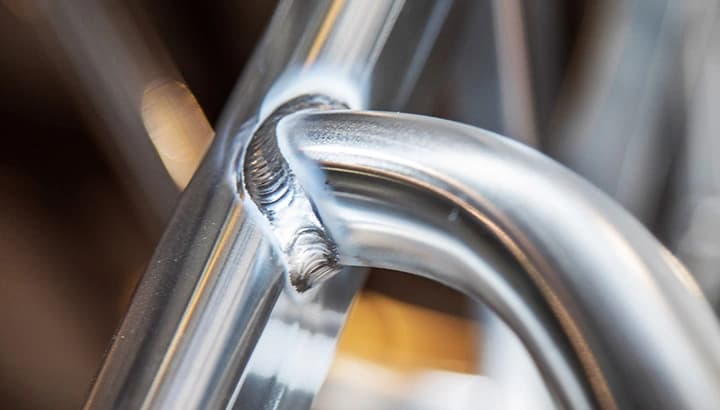
Aluminum presents immediate challenges versus steel. Aluminum has a greater potential to develop problems such as lack of fusion due to the tough oxide layer, lack of penetration due to high thermal conductivity, and porosity due to the high solubility of hydrogen in molten aluminum. As such, all moisture and hydrocarbons must be eliminated, and the thickness of the oxide film must be controlled and prevented from hydrating due to the presence of excessive moisture.
Oxides on aluminum TIG filler metal can be introduced directly into the weld puddle and lead to porosity. Oxides on MIG filler metals also cause problems, including an erratic arc, added resistance, sooting and poor feeding. And thicker oxide layers on aluminum base metals must be removed mechanically or face the risk of contaminating the weld. But, there are a few things you can do in storage to prevent this from happening:

Selecting the Proper Filler Metal for Aluminum
There are two key steps in preparing the joint for welding. First, mechanically remove the oxide layer (the oxide layer has a higher melting point than the base metal). Also remove any oil, grease, dirt or moisture that could contaminate the weld.
Here are answers to some commonly asked questions about cleaning aluminum before welding:
The short answer: No!
To avoid the common issues noted above, always clean the joint prior to welding. Most aluminum will come from the factory with oil and grease on it. First, degrease the surfaces with a solvent. Then use a cheesecloth or paper towel to clean and dry the welding joint (these are preferred because they are porous and will absorb more oils/moisture). Also wipe the opposite side of the joint clean so no impurities are pulled through the aluminum into the weld puddle.
Pro tips:
The most common method for mechanically removing the aluminum oxide layer is to use a stainless steel wire brush. Dedicate this brush only to aluminum to keep cross contamination at a minimum. For heavy pieces or to reach tight spaces, it is also acceptable to use a carbide bur. Carbide burs are typically air powered, so be mindful of the air tool exhaust so as not to introduce oils or condensation into the joint.
Use plasma arc cutting and gouging, and laser cutting, as these processes are less likely to introduce hydrogen and moisture to the oxide layer.
Don’t use cutting methods that leave a ground or smeared surface. For example, a high-speed circular saw is suitable for cutting aluminum whereas a band-sawed surface can lead to smearing. Avoid grinders when possible, but use a coarse disc grinder over a wheel grinder if it’s your only option. The goal is to use as fast and sharp of a method as possible that quickly cuts away the material rather than smearing it. A wheel grinder, for instance, can embed pieces of stone into the aluminum that may become a contaminant or inclusion. A smeared surface may cause lack of fusion and should be filed to remove any smeared metal prior to welding.
When possible, do not use lubricants in aluminum cutting applications. Any petroleum-based lubricant contains hydrocarbons, which will break down during the welding process and introduce hydrogen into the joint, leading to porosity and cracking.
When cleaning aluminum before welding, look for a solvent that leaves behind no residue. Do not use chlorinated solvents in the welding area because these substances may form toxic gases in the presence of a welding arc.
You can clean the joint with a stainless wire brush only after solvent cleaning. Wire brushing prior to cleaning embeds hydrocarbons and other contaminants in the metal surface, as well as transfers these undesirable elements to the brush — which then makes the brush unsuitable for cleaning.
If you are working with metal that has been etched, the by-product residuals must be removed prior to welding.
Clean all wire brushes and cutting tools frequently to prevent the transfer of contaminants to the weld joint and, if possible, keep dedicated brushes solely for welding aluminum to minimize opportunities for contamination.
Do not use oxy-fuel gas cutting, carbon arc cutting or gouging processes, or oxy-fuel flames to preheat. These processes damage the heat affected areas and promote the growth and hydration of the oxide film present on the surface.
Mechanically remove the plasma arc and laser cut edges from 2xxx, 6xxx and 7xxx series alloys. The melted edges of these alloys contain detrimental solidification cracks and heat affected zone conditions. Remove a minimum of 1/8-inch of metal from the cut edge. Use mechanical methods, such as milling or a coarse burr grinder, to cut and remove metal chips.
Posted Feb 6, 2023
Learn how modern handheld laser welding systems overcome aluminum reflectivity and heat challenges for consistent welds.