Proper joint prep is key with aluminum
Proper joint preparation is the most important step in aluminum TIG welding repair. Dirt, grease, oil and aluminum's natural oxides can weaken the repaired part by causing porosity, inclusions and other discontinuities.
Follow these steps for the cleanest and strongest possible TIG welds:
Disassemble and remove the part (if part of a larger component) whenever possible. Heat from the TIG welding process can be damaging to surrounding items such as motors and wiring.
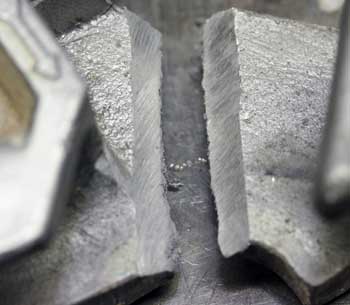
When repairing a crack, bevel the joint down to a "V" halfway through the damaged part (see close-up below). Then tack weld it together and flip the part over. Bevel out an identical "V" groove on the opposite side and tack that together. Welding on both sides adds strength and reduces any chance of breaking. If you cannot access both sides of a damaged piece, simply bevel deeper so that 70% to 80% of the damaged part's thickness can be filled with weld metal. Use a hand grinder with a 4 1/2-inch diameter wheel (36-80 grit) and bevel the damaged crack/joint. Too fine of a grit can clog the grinding wheel and won't effectively grind the joint. It may even embed impurities deeper into the aluminum.
Use a stainless steel wire brush designated for aluminum to clean the joint, as this will help avoid contamination from use on other metal alloys. A wire brush removes dirt and any of the oxides that may still reside on aluminum's surface.
Use a cleaner designated for aluminum to remove any lasting remnants of oil, grease and moisture from the joint. Remember to follow all safety recommendations. Also wipe the opposite side clean so no impurities are pulled through the aluminum and into the weld puddle.
Most TIG power sources provide good cleaning action (due to the balance control feature). However, you should never rely solely on this feature to do the job for you without properly cleaning the material. This is especially true when welding on used parts that tend to be dirtier.