 |
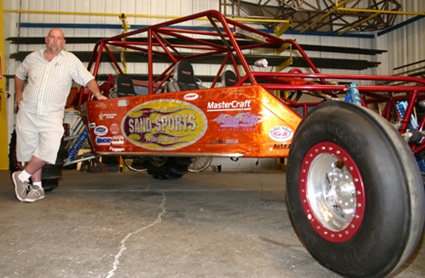
| John (The Wizard) DeVillier showing off one of his many impressive creations |
Inside the Wizard School of Fabrication, 32 potential Harry Potters are diligently learning vehicle fabrication under the instruction of John “the Wizard” DeVillier. With 25 years of experience to draw upon, he’s teaching them the welding techniques they need to realize their dreams. Not dreams of becoming certified welders—there are other schools for that—but to become vehicle fabricators. Training on Miller’s Millermatic® 175 and 210 MIG and Syncrowave® 180 SD and Dynasty® 200 DX TIG welders, the students are learning on the same models of machines they’ll most likely use as trained fabricators.
Their goal is to learn to build sandrails.
Sandrails
They used to be called dune buggies—lightweight, modified vehicles built on Volkswagen frames with 1,600cc Volkswagen engines that would cruise up and down the dunes. With only four to six inches of ground clearance, their frames took quite a beating when they’d bottom out or hit a rock, and they were limited to the size of engines they could handle.
The dune buggies evolved into today’s sandrails: fast, high-powered—some in excess of 800 horsepower—vehicles specifically designed to withstand punishing treatment in the dunes. The Volkswagen frames were the first to go. They didn’t offer enough clearance. So rail frames were built from steel or chrome-moly tubing, with suspension added that improved the ride, durability and ground clearance. Then the Volkswagen engines went and were replaced by higher horsepower engines. Today, it wouldn’t be unusual to find a twin turbo Corvette engine powering a sandrail through the deserts of Southern California or the Baja Peninsula.
Sandrails, as an industry and a sport, went through a period of tremendous growth in the last decade. It is estimated that more than $2 billion per year is spent pursuing the sport. DeVillier, who said there are 200,000 people on the dunes on any holiday weekend, is not surprised by the popularity explosion.
“Why are people spending $100,000, $150,000 on a sandrail? What makes them so cool?” DeVillier asked. “In my view, it’s because there’s no speed limit in the desert, no lane. It’s a freeway without guardrails. The old street rodders have cars that go can 100 mph in a blink of they eye. But you can’t safely get that acceleration on the street. The desert is safe…if you’re trained and know what to do.”
The industry is fighting to keep up with demand. Less than 10 years ago, there were about 15 manufacturers in Southern California. Now there’s more than 115, and the waiting lists for a sandrail may be as long as one year. The need for fabricators who can build the high-powered machines is at an all time high.
Enter John DeVillier and the Wizard School of Fabrication. With about 25 years of building custom vehicles, helping others build theirs and writing magazine articles, he was one of those who helped transform the industry. Now, he’s given up fabricating to start the Wizard School and share his years of experience and knowledge with others to help the sport grow.
Wizard School of Fabrication
DeVillier said that most fabricators learned the way he did: teaching themselves or by working their way up from floor sweepers to fabricators in someone else’s shop. But there’s never been a reliable source of education for sandrail fabricators. With high-powered cars that can quickly hit 120 mph, having properly designed and built frames is crucial. While DeVillier was running his own fabricating business, he noticed the shortage of educational resources and decided to share his expertise with others.
“I designed the school thinking I would have 10 guys come in here. The initial response was more than I hoped. The first class had 32 students,” DeVillier said. Interest grew quickly and additional classes were soon added.
 |
|
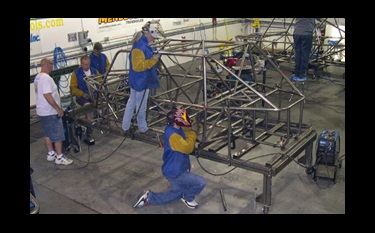
Students work in teams to come up with the best sandrail frame design.
|
DeVillier approached Bob Castro and Kirk Merica of Five Star Gas & Gear to price the Miller welders he would need for the school. When Bob and Kirk heard DeVillier’s vision for the school they helped him acquire the necessary equipment without having to resort to outside financing. Another big asset was the support Miller offers after the sale. Although the welders are durable, they would occasionally break. As John said, “Some students will find a way to break a 2-in. piece of plate steel.” But the support from Miller has helped him keep the machines running perfectly. With the support of Five Star Gas & Gear, the Wizard School of Fabrication was able to place their students in front of professional quality welding equipment, the same types they’ll be using once they leave the school.
The school quickly expanded from Riverside, Calif. to locations in Phoenix and Las Vegas. Classes are taught in sandrails, rock crawlers, choppers and prerunners, vehicles used by desert racers to “pre-run” the course. Students who pass the course school and want to become instructors take another six-month course, then work as student instructors until DeVillier feels they are ready to teach others.
The Students
According to DeVillier, his typical student is a 17-year-old who started riding four-wheelers at an early age and maintained his interest in motorsports. Now, he wants to build cars. But not all of his students have that lifelong motorsports background. Some, perhaps inspired by the wealth of television fabrication shows, have no experience in the dunes. Fathers and sons, and at least one husband and wife team, have taken the school to pursue a shared interest. More potential students from around the world view his Web site daily.
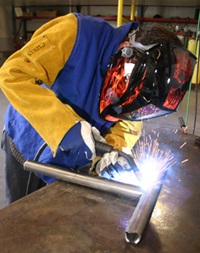 |
A wizard in the making learns the finer points of MIG welding tubing.
|
They all have one thing in common: they want to learn to fabricate. There are few other places to learn that combination of skills.
“Welding schools don’t teach what I teach,” DeVillier said. “A lot of schools teach how to lay a basic weld, but they’re not teaching how to cope and bend a tube or build a fixture. Our students learn how to design and build suspension geometry. It’s more of an art form. Whether they become professionals or hobbyists, what they learn here will stick with them.”
The Equipment
Students don’t start talking about building cars until the sixth week. Before that DeVillier spends a week teaching MIG welding and about five weeks teaching TIG welding. The welders they work on are Miller’s Millermatic 175 and Millermatic 210 MIG, Syncrowave 180 SD TIG and Dynasty 200 DX TIG welders.
“If you’re going to be a fabricator, you need a good TIG and a good MIG welder,” DeVillier said. “There’s no getting out of it: you need both.” In some cases, such as the jig tables the students build, TIG welding would work, but DeVillier feels it’s not worth the time, and MIG is perfectly suited to the task. Plus, he added, if you’re going to do repair work, most of the cars are MIG welded and you have to match weld for weld. TIG welding, however, is mandatory for suspension and for “all the cool aluminum stuff.”
For someone fabricating at home, the Millermatic 175 “is an incredible little welder and quite affordable,” DeVillier said. “But the Millermatic 210, with its larger wire spool capacity and higher duty cycle, makes it more suited for someone doing commercial work,” he added.
“The Millermatic 210 and Millermatic 175 are the staples of this industry,” DeVillier said. The Millermatics are especially suited for sandrail fabrication and extremely user friendly, John said, adding that, “The Millermatics have soft arcs, and when you’re tube welding, it’s easier to start the arc. It’s softer and gets better wet out.”
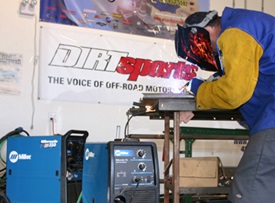 |
This student works with both the Millermatic 175 (front) and the Millermatic 210 (rear) as he practices his MIG welding |
The Millermatic 175 is an all-in-one MIG welding system from Miller Electric Mfg. Co. that offers a smooth, clean arc with less spatter and better low-end welding performance on material as thin as 24-gauge (.025 in.). It combines wire feed speed tracking and infinite voltage control, a unique function for this type of unit.
Infinite voltage control gives operators finer control of the voltage setting while wire feed speed tracking automatically increases or decreases wire feed speed as the voltage changes. This makes the units easier to tune in for the application and results in a broader ‘sweet spot’ so that operators can resume welding without a lot of fine tuning.
“Other welding units force you to spend more time adjusting the wire feed speed to get a decent arc,” says Ken Stanzel, product manager, Miller Electric Mfg. Co.
For welding thicker materials, the 80-lb. Millermatic 175 uses 230 V input power and delivers a maximum output of 175 amps at higher duty cycles for welding materials up to 1/4 in. (6.4 mm) in a single pass.
The Millermatic® 210 offers the most powerful, best performing all-in-one MIG welding performance in its class. It delivers superior welding performance and increased productivity in auto body, fabrication and repair applications.
To achieve the widest output range in its class, the Millermatic 210 features seven voltage taps. With a welding range of 30 to 210 amps (160 amps at 60 percent duty cycle), the Millermatic 210 offers 10 amps more power than any comparable machine at any duty cycle. Fabricators can fine-tune the arc to obtain better results on materials as thick as 3/8 in. or as thin as 22 gauge. It has a higher duty cycle than the Millermatic 175, making it more suitable for professional fabricators.
The Syncrowave 180 SD TIG welders are small and easy to use, DeVillier said. But he also speaks highly of the Dynasty 200 TIG welder, whose inverter technology and Auto-Line™ capabilities (more on Auto-Line later) make it extremely light weight and portable. They Dynasty 200’s ability to run on 110 volts means an operator can take one to the desert, plug it into a small generator and start to weld.
Miller’s Syncrowave 180 SD TIG/Stick power source adjustable AC balance control enables users to tailor penetration and cleaning action while TIG welding aluminum. The Syncrowave 180 SD allows operators to preset desired welding amperage with digital meters and also provides dramatically better arc starts through its selectable arc start condition feature. Other new features include Fan-On-Demand™, adjustable postflow, last-procedure recall and built-in cable hangers.
The unit has an output of 10 to 180 amps (150 amps at 40 percent duty cycle) in both the AC and DC TIG welding mode and a stable TIG arc throughout its entire range. It can weld any weldable metal.
“The Syncrowave 180 SD provides many of the performance benefits found in Miller’s larger industrial TIG welders, yet it is affordable enough for hobbyists involved with race cars, as well as airplanes and art,” said Brent Williams, product manager, Miller Electric.
The Syncrowave 180 SD’s Squarewave technology helps eliminate tungsten spitting and increases arc stability on aluminum and other metals that require an AC weld output. The Syncrowave 180 SD features an adjustable AC balance. This allows operators to add more electrode negative (EN) for a narrower, deeper penetrating weld bead or to decrease EN for a wider, shallower bead with better cleaning action for oxide removal.
Like larger Syncrowave models, the Syncrowave 180 SD’s selectable arc start function ensures consistent and repeatable high-frequency AC and DC TIG arc starts. It controls the initial volume of current to create a “soft start,” a “standard start” and a “hot start.”
“Soft start helps operators welding thin metals or on edges, while hot start improves starts with the larger diameter tungstens used for welding thicker material,” said Williams. Miller pre-sets the machine in the standard start mode to optimize performance for general use with the most popular electrode sizes. To change starting conditions, simply access a hidden menu by putting the polarity switch in the “1” or “11” o’clock position and turn on the machine while holding the process button.
The Dynasty™ 200 is an AC/DC TIG/Stick inverter, has an AC welding range of 5 to 200 amps, a DC welding range of 1 to 200 amps and an unbeatably stable arc throughout its entire range. Because it relies on inverter technology, it’s highly portable, weighing 45 lbs. vs. the Syncrowave 180 SD’s 224 lbs. It features Miller’s exclusive Auto-Line™ Technology, which enables the Dynasty 200 to plug into any primary power in the world, from 120 through 460 volts, single- or three-phase, 50 or 60 Hz. Auto-Line works without any manual adjustments or linking mechanisms, which improves reliability. Further, Auto-Line maintains a steady welding output even if primary power varies widely.
“Unlike with competitive TIG/Stick inverters, welding operators will never experience a fluctuation in the welding arc so long as the primary power remains within a 120 to 460 V range,” said Williams. “With this type of primary power and weld process flexibility, the Dynasty 200 meets the needs of those who weld both in the shop and the field.”
Many Wizard School students purchase a Millermatic, a Syncrowave 180 SD and a Miller Spectrum plasma cutter before graduating the school, taking advantage of the lifetime discount Five Star Gas & Gear offers the students.
The Classes
After safety instruction, the students immediately start learning to weld the Wizard School way." Little time is spent learning where the gas comes from or how it gets into the bottle," DeVillier said. "The teachers put the students on the welders, set the parameters and teach them how to “snap weld.”
“My biggest challenge is a certified welder,” said DeVillier. “He’s going to come in here and teach me how to weld. My question to him is, ‘I build $100,000 cars. How many have you built? Open your mind to what I’m going to teach you.’ A certified welder in this industry is in the wrong field.”
DeVillier’s easiest student to teach, he said, is one who comes in not knowing how to weld. DeVillier can teach him the welding techniques and skills that will serve him throughout his fabricating career. All it requires is an open mind and the desire to learn.
“When we start, the students just want to get in there and start welding. Many assume that because the welder is making a sizzling noise that they’re welding,” said Chris Begley, a manager and instructor and DeVillier’s right-hand man. “But we show them how to dial the welders in to adjust for the material and student’s unique style. We let them make mistakes at first and gradually pull them out of there. You can only make ugly welds for so long, then you should start to get better.”
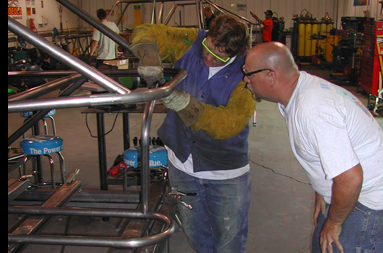 |
| John DeVillier offering advice to a Wizard School student. |
The personal instruction and hands-on approach is the key to the Wizard School’s technique.
“You need somebody to teach you when to turn up the voltage and wire feed speed and when to turn them down. Someone to say, ‘You’re getting there. Hold the gun more this way. Keep practicing,’” DeVillier said. “We can look at a weld and tell if it’s too hot or cold. We share that with the student so he can see it too. Once the student starts seeing the difference—and you have to see the difference—they start making beautiful welds. All of a sudden, they get it.”
A cold weld stands up, coming out of the metal, DeVillier said. “It looks like you took a piece of clay and dropped it on the table. The edges roll under and it’s not penetrating. A too hot weld deforms the metal and you can see where it pools inside the tubing.”
Students start by welding scrap 1-1/2” diameter, .120-in. wall tubing to a piece of flat bar. But since there’s little flat welding on a car, they quickly move on to “real world” welding. They learn to notch tubes and weld them together at hard-to-weld angles (narrow or “included” angles with a bend of less than 90 degrees). This is the type of welding they will be using throughout their careers as sandrail fabricators.
For MIG welding, Wizard instructors teach “drag” as opposed to “push” technique. The push technique produces excessive spatter, DeVillier said. The drag technique also lends itself to starting and stopping the weld, backing up into the previous weld to produce a stacked dime effect.
The welding technique is a modified spot welding technique. By using a series of short welds at relatively high parameters students can make a weld with good penetration without fear of burn-through or creating a high crown, which affects the aesthetics of the weld. Once the arc starts, the student directs the arc into the edge of the previous weld, the moves forward about ¼-in. This creates a stacked-dime effect. Since running a continuous weld on a stationary pipe is difficult, this technique also lets the students reposition themselves as needed.
After a week spent on MIG welding, the students move to TIG. Working on Miller 180 SD or Dynasty 200 TIG welders, they spend four weeks learning the techniques necessary to become sandrail fabricators. Although TIG can be used throughout the car—DeVillier uses TIG welding exclusively on his personal projects—TIG is necessary for fabricating the suspension where chrome-moly tubing is used for the necessary strength. In addition to the suspension, the students will each TIG weld an aluminum fuel tank.
Although it’s considered by many to be the most difficult process to learn, TIG welding’s concentrated arc permits pinpoint control of the heat, resulting in a smaller heat affected zone that might weaken the tubing. It also lessens the chance of cold spots that might occur with MIG welding since incomplete fusion is not obscured by the wire.
Miller’s squarewave technology allows the operator to fine tune the amount of penetration and cleaning action, which is necessary for high quality aluminum welding. When performed by a trained welder, TIG welding provides a highly aesthetic appearance.
Following basic welding instruction, students move on in groups of five or six to build jig tables. The tables give students the opportunity to practice their fabricating and welding skills and provide a firm base for building the sandrails.
“Without a good assembly table and level, square platform, your car will never be accurate,” DeVillier said. “You need to make sure both sides of the car are exactly the same height. Front to rear, everything is equal on both sides. The center and the front of the jig table are your plane points for measurements. You always measure inside out, front to rear. So we teach them how to build a jig table. Then we move into the actual designing and building of the car.”
Design
Students may bring in photos from magazines as a basis for their team’s car design.
“They’ll say, ‘I like the nose of this car in the magazine. We want to put this kind of cage in. We like the back end on the car.’ We say, ‘we want you to do better than that and come up with your own design.’ And we pit teams against each other to see who can come up with the best design,” DeVillier said.
 |
|
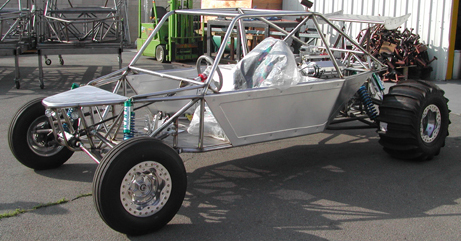
A complete student project rolls out from the Wizard School of Fabrication.
|
Although no codes regulate the design of sandrails, DeVillier stresses safety in all of his cars, adding, “With cars that can exceed 100 mph, you have to have a roll cage around you and guard rail safety to protect you from a massive crash. In our school, we teach safety because we know these guys are going to go put a small block Chevy making 500 horsepower in the vehicle. We know they’re going home and going to do that, so we teach these students to be concerned with chassis integrity. Students are taught to cross brace the frame in every direction. No tube is placed without support.”
With these principles in mind, the students come up with a concept design for their car. They determine the look, the seating room and engine type and placement. They plan where the suspension points will be to ensure they have adequate bracing. Nothing in the frame is prefabricated. The students have to design and build it.
With the design established, the students move to the jig tables to start laying out the floor of the car. At this point they all have the same strong structure, but individual differences are apparent in the different cars: some are wider in points, some narrower. But they all have a strong spine and nose integrity on which to build.
Critiquing one of the students’ cars, DeVillier pointed out the important design elements. “ Everything is extremely strong on this car,” he said. “This tube is supported by a tube in the spine. That tube is supported by another tube. This is a truss that the suspension works on, so that the car isn’t being twisted by the suspension and bottoming out. An impact here is going to be absorbed and managed through the chassis. The last thing you want is to have the chassis move away from you or come in on you and cause damage to your body. So we want this structure to be strong and maintain its integrity during an accident.”
Although many sandrails use 4130 chrome-moly tubing throughout, DeVillier’s student only use that for the suspension, and use a .120-in. wall ASTM 1015 DOM steel for the frame. He notes that chrome-moly is stronger, but it’s not as forgiving for a recreational vehicle. A car making high speed transitions between steep slopes and the bottoms of sand bowls puts a lot of stress on the frame causing it to flex.
Chrome-moly, while stronger than the DOM tubing, is not as flexible and may break quicker. A sandrail made from .120-in. wall DOM tubing will last up to 20 years if it’s built right, DeVillier said.
The entire car is tack welded together before everything is finally welded into place. DeVillier said a minimal tack weld is best because it allows a person to fix errors without having to knock out tubes or cutting and grinding mistakes away.
Once the car is tack welded, it’s wired to the jig table with heavy wire to keep it from shifting during final welding. The welding starts at the center of the car and progresses out and around the car to get it to draw in on itself rather than twist or distort.
When the chassis is done, the students head into the classroom where they discuss suspension theory: how does it work, what happens as the arm goes up and down?
“This spindle is an example. It has to do something when it goes through its travel. If it were to go straight up and down, the tire degree would never change. But as the chassis leans going into a corner and that tire is compressed, you need to have a camber change. So we teach them geometry of that,” DeVillier said.
“Suspension geometry is very important in any off-road vehicle,” he added. “I don’t care what it is. You could build a go-kart and it could be so unsafe because it’s not set up right. TIG welding is necessary in the suspension to ensure weld integrity.”
Once the suspension is designed and built, the students are ready to start fabricating on their own. Some will return to become instructors or to take advanced classes. Some will head to their garages to work on their dream cars.
Their education isn’t complete. They will continue to improve their welding and fabrication skills, but they’ll be beginning with a strong foundation: trained on Miller equipment the Wizard-school way.