Race car metalworking
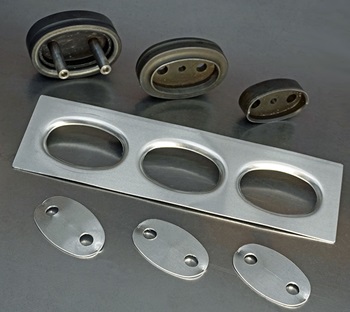
My first metalworking experience was building aluminum bodies for dragsters in the 1960s, so race cars have always been on my radar. The fastest cars at the time were supercharged and often featured a cast aluminum fuel injector scoop on the blower. Since this was the highest point on the engine, it was one of the most eye-catching parts of the entire car.
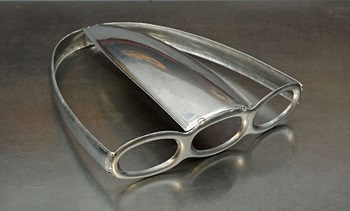
For this article, we’re going to make an air scoop from aluminum sheet to fit on a single four-barrel carburetor, capturing the flavor of the more exotic fuel injector scoops. I decided to make my scoop with three oval holes, with bulged shapes that taper toward the rear.
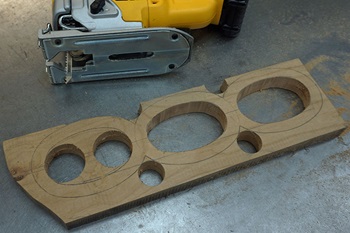
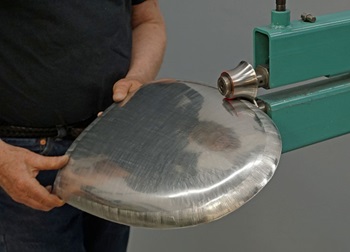
The first step was using oval punch and flare dies to make three identical holes in a flat piece of 1/16-inch thick aluminum sheet. These dies form a perfect 1/4-inch radius on the inner side of the hole. I wanted to continue this radius to the outside of the opening, so I made a wooden hammerform to facilitate the process.
I cut three holes in a hardwood board that matched the holes punched in the aluminum sheet, then I trimmed the outside edge of the hammerform 1/2 inch away from the hole.
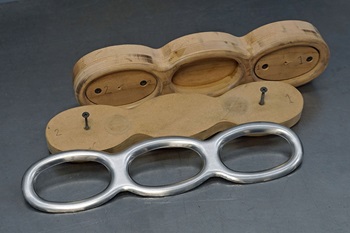
I used a 1/4-inch edge rounding bit in a router to radius all the edges. Next, I trimmed the outer edge of the aluminum flush with the hammerform, clamped the metal tightly to the form, and shaped the outer edge by hammering against the form. This worked to perfection, and it would have been difficult to shape a part this intricate any other way.
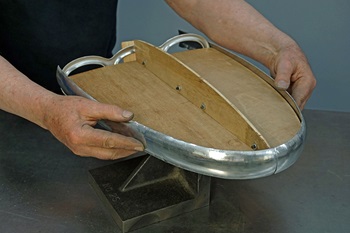
After hammerforming the front of the scoop, I decided to curve it a little to give it a rounded front edge. I made a simple buck from thin plywood to work out the length, width and contours of my scoop. Before shaping metal, it’s good to have some sort of guide to keep you on track through the process, and the wooden buck allowed me to gauge the shape of each element as I moved forward. I temporarily fastened the front piece of the scoop to the buck, and everything was looking good so far.
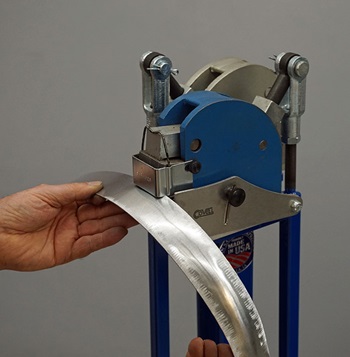
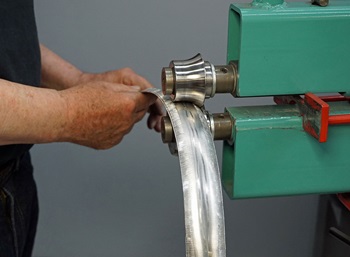
Next, I shaped the band of metal for the sides and rear of the scoop. I cut two strips of metal 1 1/2-inches wide and used a foot-operated metal shrinker to curve the strips in two planes. I used a depth stop on the shrinker, adjusted to provide optimum engagement with the jaws on both sides of this narrow strip.
Once both strips were rough shaped, I ran them through a beading machine with Rounding Over dies, which gave both parts a consistent profile.
I adjusted the parts until they fit the buck perfectly, then trimmed and prepped them for welding. I knew the buck could not be removed after the first few pieces were assembled, so I carefully marked the pieces to maintain their alignment.
I welded the parts together on the bench, being careful to preserve the alignment they had on the buck.
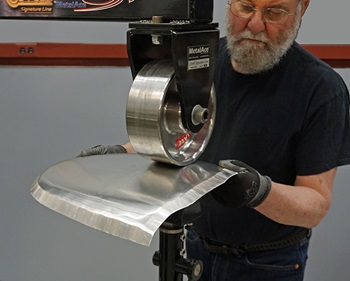
Next, I made a paper pattern for the bulged shape that would flow back from the center opening. I then transferred the pattern to a sheet of metal and cut the part out. I used an English wheel to give the part a compound curve.
With the part properly shaped, I use a small set of Rounding Over dies to put a curl on all the edges where the joints would be welded.

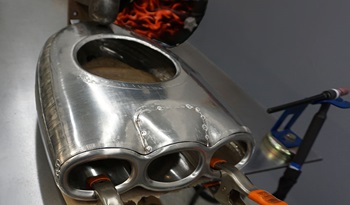
Now the center piece could be tack welded to the front and perimeter.
Next, I made a pattern for the side pieces and cut two (slightly oversized) metal pieces. I shaped these on the English wheel, then trimmed them to fit precisely and tack welded into place. I was extremely careful with the fit on these parts, since the better the fit, the better the weld, and I wanted to minimize any distortion from the welding.
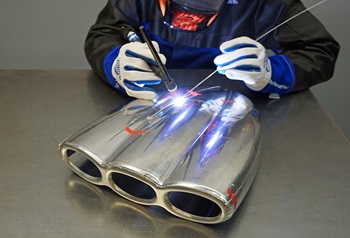
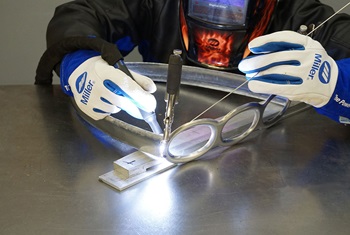
I used the pulse feature on my Dynasty® 210 TIG welder, set to 33 pulses per second with the background set at 33%, and I skipped around as I finish welded the joints. This kept the heat to a minimum — and ensured that I got very little distortion. I set the machine to 100 amps, but with the modulation of the foot pedal I was probably welding at about 65 amps. I used a 3/32-inch diameter 2% ceriated tungsten, ground to a sharp point. I utilized a #7 cup and flowed 16 cfh of argon. The filler rod is 1100 alloy, 1/16 inch in diameter. It’s essential that these welds are free of voids and have full penetration. The inverter machines really help with this.
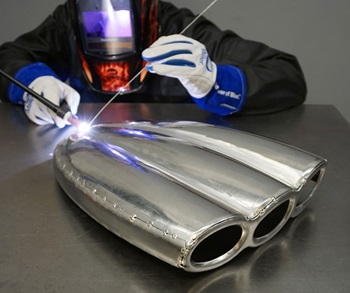
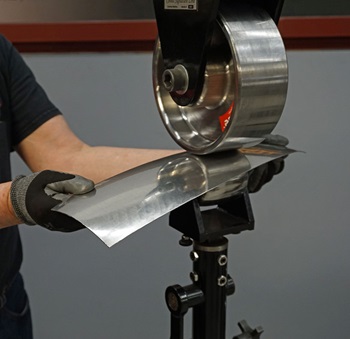
I smoothed the welds on the top at this stage, while I still had unobstructed access to the inside of the scoop. I ground away the bulk of the weld with a sanding disk, and I used a foam-backed pad to get into the grooved areas. The last step was drawing a vixen file over the sides of the scoop. This revealed any low spots, which were then tapped up, and I continued picking and filing until the shape was dialed in perfectly.

The bottom of the scoop was a bit easier than the top, since it’s mostly one piece and the grooves are very short. I made a paper pattern for the bottom, then cut a matching piece of aluminum and used the shrinker to rough shape the part. Next, I smoothed the center with the English wheel.
I used Rounding Over dies to make the edge radius uniform.
After fitting the bottom to the scoop, I cut an opening to fit over a small aftermarket air cleaner. I decided to make the convoluted section as a separate piece. I cut out a small area around the center opening, then shaped the edges to fit the front and formed a new piece of metal to fit.
I welded the filler piece to the scoop bottom so I could smooth the welded area before the bottom was joined to the scoop. Now I could weld the bottom into place, and I focused on maintaining precise alignment as I tack welded the parts together since my access inside the scoop became very limited at this point.
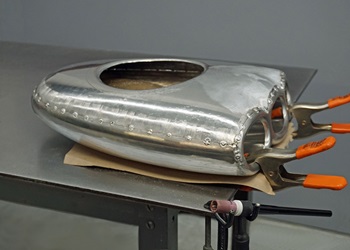
Thanks to the careful fit-up, the welding on the bottom was pretty straightforward, and the tight curvature along the welded joint minimized the distortion.
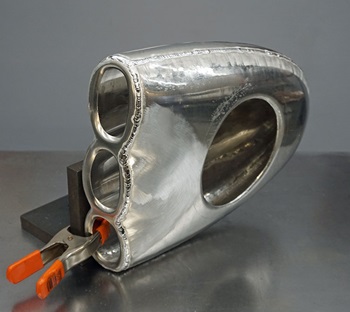
The final step was grinding the weld smooth and running a file over the joints. Any low spots that were revealed were tapped up, and the scoop was re-filed until the shape was perfect.
This was a fun project for me — and I hope it inspires you to start a cool project of your own!
.jpg?h=252&w=350)