Copyright 2005 by Ron Covell
Last month we looked at the MIG process, which is definitely the most popular type of welding used for street rods. This month we'll explore TIG welding, which many people consider the premiere welding processes.
Since MIG welders offer a good-quality weld with a moderately-priced machine, coupled with high strength and high speed, why would you consider anything else? It really comes down to control, versatility, and the hardness of the weld bead.
TIG welding produces temperatures up to 35,000 degrees Fahrenheit, yet this concentrated heat can be precisely controlled and directed. When filler metal is required, it can be added manually by feeding welding rod into the puddle, similar to oxy-acetylene welding. In fact, people who have learned to oxy-acetylene weld will usually pick up TIG welding fairly easily.
TIG welding is done with a hand-held torch that holds the slender electrode the welding current passes through. The electrode is surrounded by a ceramic cup which directs the flow of an inert shielding gas (usually argon) that keeps atmospheric oxygen away from the weld zone. Most machines have a control, either foot or hand-operated, that allows you to change the welding current 'on the fly'. These features offer unrivaled control of all aspects of the welding process, and a skilled operator can make a weld that has good penetration with a small, crisply-defined, low-profile weld bead which is quite ductile, or workable. The workability of the weld is an enormous advantage for those doing high-end bodywork, since the best way to repair the distortion caused by welding is to hammer on-dolly on the weld bead! MIG welds, while quite strong, are more brittle than TIG welds, and may crack if they are hammered too much.
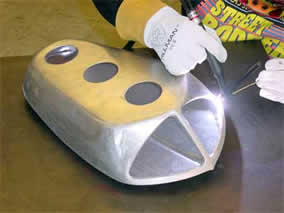 |
| One of the advantages of TIG welding is the ability to direct the welding heat with precision. Here a tiny crack is being repaired in the corner of the inlet area on a custom aluminum air scoop. |
Another benefit of the TIG process is that it can be used to weld just about any metal. It's great not only for steel and aluminum, but for stainless, titanium, copper, bronze, and magnesium, to name just a few.
TIG welding has been around since the 1940's, and although it was considered esoteric at first, now that many people are aware of the advantages offered by TIG welding, the machines have become quite popular and affordable. Most of the better street rod shops (and many serious home builders) utilize TIG welding for both body and chassis work. Once you've become accustomed to the incredible control it offers, and to the beautiful look of a well-formed TIG weld bead, most people get hooked!
The type of TIG machine you should purchase depends on the type and thickness of metal you'll be welding. A TIG welder with a 180 or 200 amperage output, and AC/DC output capabilities will handle most automotive applications. (You need both AC and DC output if you want to weld on steel and aluminum.) For doing bodywork, it's a real advantage to have a machine that will go down to very low settings - starting a weld around 5 or 10 amps is very beneficial sometimes. Some older machines only go down to 25 amps, and it's a bit tricky to do delicate welding on very thin metal with that much amperage.
 |
| Proper safety gear is essential for welding. Notice the auto-darkening welding hood, gloves, and long-sleeve shirt. Notice also that the welder has his forearms braced on the table edge, and that the angle between the torch and filler rod is 90 degrees. |
While TIG welding offers many advantages, learning to make pretty weld beads, which involves coordinating your hands, feet and eyes, takes patience and lots of practice. When you become proficient with TIG welding, the results are very satisfying. Here are a few tips to get you started.
1. Clean everything carefully - including both sides of the base metal and the welding rod. TIG welding is particularly sensitive to any contaminants, which can severely compromise the integrity of the weld.
2. Before you start to weld, get in a comfortable position and relax. Maneuvering a TIG torch is like trying to write neatly in a small space. Brace your arms, move slowly, and focus your attention on the tip of the tungsten electrode - in fact, many people grip the torch like a pencil.
3. Hold the torch at the proper angle. Travel angle is defined as the angle relative to the torch in a perpendicular position. Normal welding conditions call for a travel angle of 15 to 20 degrees. Travel angles beyond this lead to less penetration, poor direction of the weld metal, poor shielding gas coverage, and general arc instability.
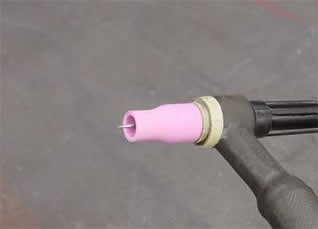 |
| Here's a close-up view of the business end of the welding torch. Notice that the tungsten electrode is carefully sanded to a very fine point. |
4. When TIG welding, always use the push technique - pushing the torch ahead of the weld puddle. Pushing offers you a better view of the weld puddle, provides good gas coverage of the weld, and ensures that oxides have been removed when using alternating current, as you will when welding aluminum.
5. Practice welding on scrap. Start by running a bead on a flat piece of metal - don't try to weld a joint or add filler at first. Experiment with the amperage control to find the right amount of heat. Learn how to control the size and shape of the weld puddle.
6. To start an arc with a machine equipped with high frequency (most good machines are), hold the electrode about 1/8 in. from the work and depress the foot pedal - never touch the electrode to the work during a high frequency start. Many people tilt the torch and rest the gas cup against the work, establish the arc, and then shift the torch into the proper welding position.
 |
| This is a weld bead on 19 gauge steel sheetmetal. Notice how low-profile the weld bead is, making clean-up easy. The heat-affected zone (the discolored area) is less than 1" wide, which means the panel will have only moderate distortion. |
7. Maintain consistent arc length - about one electrode diameter from the work. Varying the arc length produces inconsistencies. One common error beginning TIG welders make is lifting the torch or tilting the torch too much to get a better view of the weld puddle. If you need a better view of the weld area, shift the position of your head down and to the side.
8. Maintain a travel speed consistent with the bead shape you desire. Moving the torch very quickly creates a bead that is too narrow, while moving the torch too slowly produces an excessively wide bead. When TIG welding, don't move the torch forward until the weld puddle reaches the desired size. Remember that holding the torch too long in one spot can result in melting a hole through the base metal, especially when welding thin metal.
9. Once the arc is started and you've established a weld puddle of the desired size, you can begin to add filler metal. Hold the filler rod at a 15 to 20 degree angle up from the workpiece, creating a 90-degree angle between the filler rod and the tungsten. Be sure to move the torch and the filler rod progressively so that the weld pool, hot filler rod end and the solidifying weld are covered by the flow of shielding gas. A common mistake is touching the electrode with the filler rod, or touching the weld pool with the electrode. In either case, the tungsten usually becomes contaminated. Always stop and re-sharpen The electrode before you continue.
 |
 |
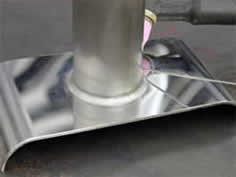
| Here's a fillet weld joining a stainless steel tube to a plate. For this type of weld, the torch is held at a 45 degree angle to both parts. Notice how uniform the TIG weld bead is! |
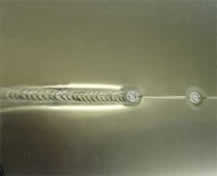
Here's a weld bead on aluminum sheet. Notice how the ripples in the weld bead look like an overlapping stack of dimes. Clean welds like this are the hallmark of TIG welding. |
10. It takes a long time to learn how to combine all the movements TIG welding requires - where to hold the torch, how fast to move the puddle, and how much rod to feed. Have patience, and practice the same moves over and over again - that's the only way you're going to learn to make a good TIG weld. If you need more information on equipment or welding technique, one good on-line source is www.millerwelds.com. You'll find an extensive education section with e-training, tech tips, ask the expert sections and more information to help you get the most from your welding experience. You'll even see articles from Ron Covell (a.k.a. Professor Hammer) on the website!